> ## Documentation Index
> Fetch the complete documentation index at: https://docs.crafter.net.tr/llms.txt
> Use this file to discover all available pages before exploring further.
# Discord Integration & Webhook Alerts
> Discord server sync, real-time event triggers, dynamic variables, and rich embed builder.
The Crafter Discord module enables automated real-time alerts for store purchases, credit top-ups, new registrations, tickets, and forum activity sent as rich embeds directly into your Discord channels.
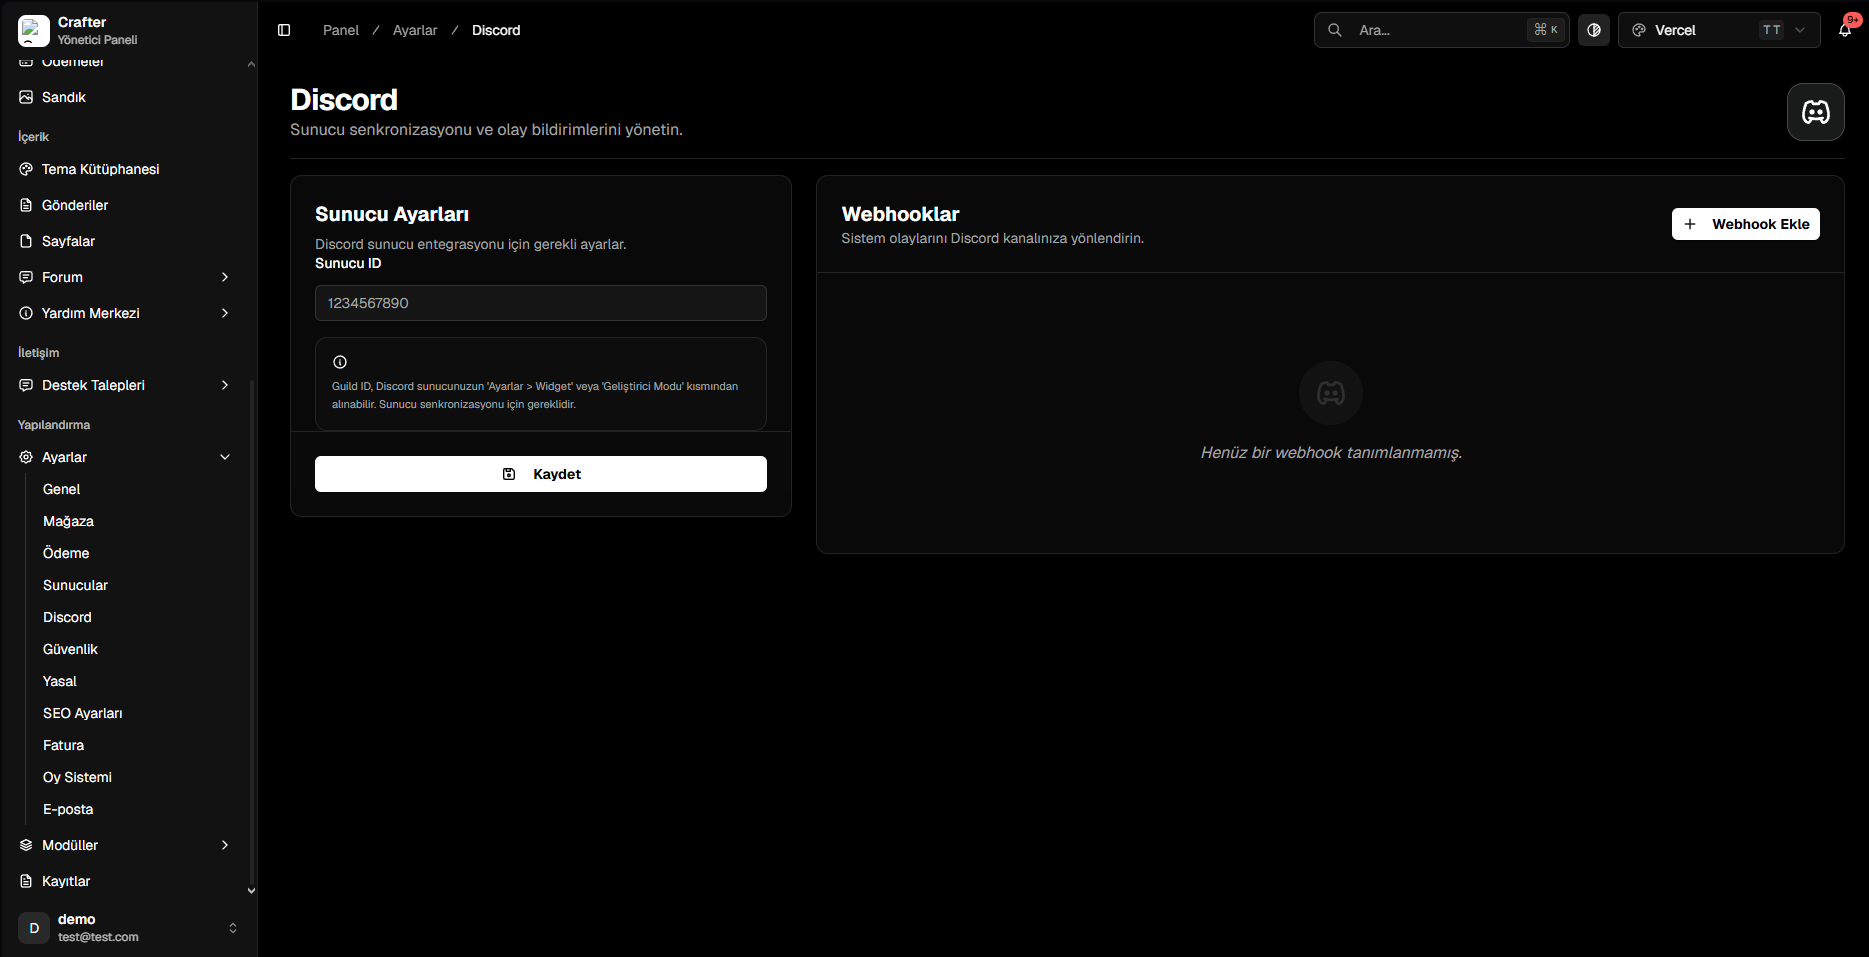
Navigate to [Dashboard > Settings > Discord](https://app.crafter.net.tr/tr/dashboard/settings/discord) to link your server ID and configure webhook alerts.
 ***
## 1. Discord Server (Guild ID) Setup
* **Guild ID:** Right-click your Discord server icon (with Developer Mode enabled) and copy your **Server ID**, then paste and save it to enable widget synchronization.
***
## 2. Adding a Webhook Alert
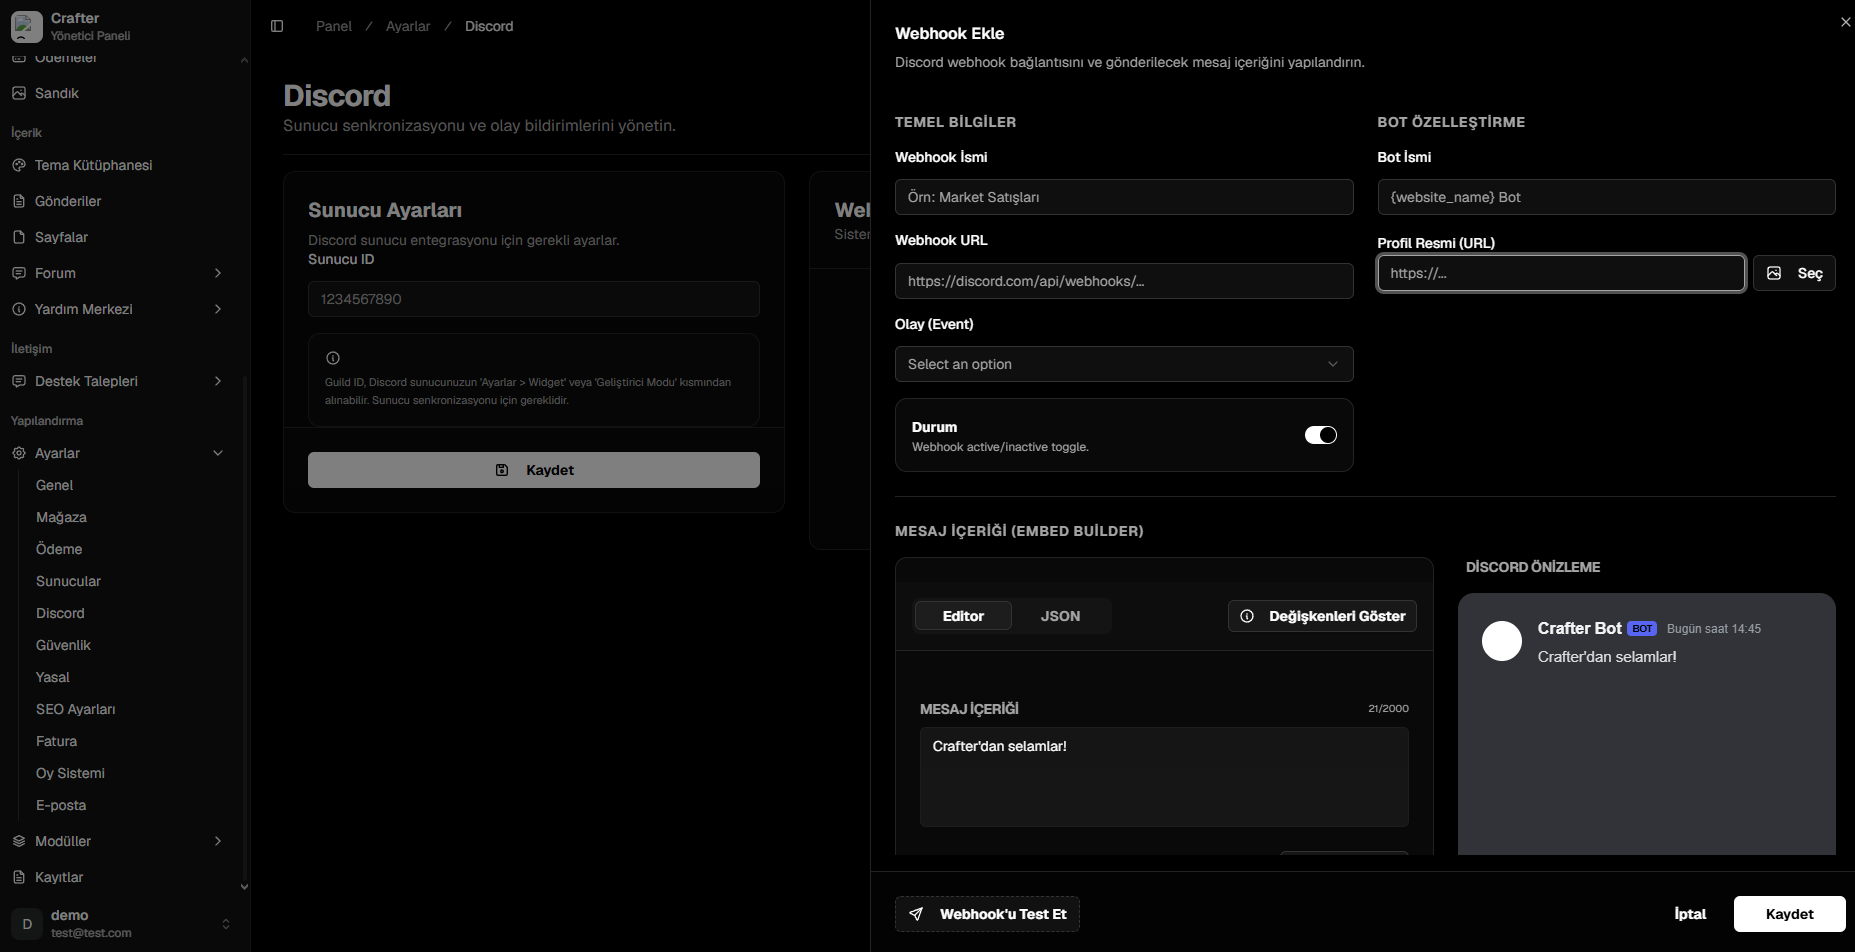
Click **+ Add Webhook** in the top right corner.
* **Webhook Name:** Internal label (e.g., `Store Purchases`, `Support Tickets`).
* **Webhook URL:** Destination URL copied from Discord channel integrations.
* **Event:** Trigger event (e.g., `purchase_product`, `balance_load_success`, `create_ticket`).
* **Active:** Enable toggle.
* **Bot Username:** Custom display name (e.g., `{website_name} Bot`).
* **Avatar URL:** Image link for bot profile picture.
***
## 1. Discord Server (Guild ID) Setup
* **Guild ID:** Right-click your Discord server icon (with Developer Mode enabled) and copy your **Server ID**, then paste and save it to enable widget synchronization.
***
## 2. Adding a Webhook Alert
Click **+ Add Webhook** in the top right corner.
* **Webhook Name:** Internal label (e.g., `Store Purchases`, `Support Tickets`).
* **Webhook URL:** Destination URL copied from Discord channel integrations.
* **Event:** Trigger event (e.g., `purchase_product`, `balance_load_success`, `create_ticket`).
* **Active:** Enable toggle.
* **Bot Username:** Custom display name (e.g., `{website_name} Bot`).
* **Avatar URL:** Image link for bot profile picture.
 ***
## 3. Dynamic Variables (Placeholders)
Use `{variable}` placeholders inside embed titles, bodies, and footer texts:
| Placeholder | Description | Example Output |
| :--------------------- | :--------------------------- | :----------------------- |
| `{username}` | Triggering player's username | `Steve` |
| `{website_name}` | Configured website name | `Crafter Network` |
| `{website_url}` | Platform URL | `https://yourdomain.com` |
| `{product_name}` | Store product purchased | `VIP+` |
| `{price}` / `{amount}` | Transaction value | `15.00` |
| `{currency}` | Currency symbol | `$`, `€`, `₺` |
| `{ticket_title}` | Ticket subject | `Issue with Top-up` |
| `{ticket_id}` | Unique ticket ID | `CRF-9821` |
***
## 4. Visual Embed Builder
***
## 3. Dynamic Variables (Placeholders)
Use `{variable}` placeholders inside embed titles, bodies, and footer texts:
| Placeholder | Description | Example Output |
| :--------------------- | :--------------------------- | :----------------------- |
| `{username}` | Triggering player's username | `Steve` |
| `{website_name}` | Configured website name | `Crafter Network` |
| `{website_url}` | Platform URL | `https://yourdomain.com` |
| `{product_name}` | Store product purchased | `VIP+` |
| `{price}` / `{amount}` | Transaction value | `15.00` |
| `{currency}` | Currency symbol | `$`, `€`, `₺` |
| `{ticket_title}` | Ticket subject | `Issue with Top-up` |
| `{ticket_id}` | Unique ticket ID | `CRF-9821` |
***
## 4. Visual Embed Builder
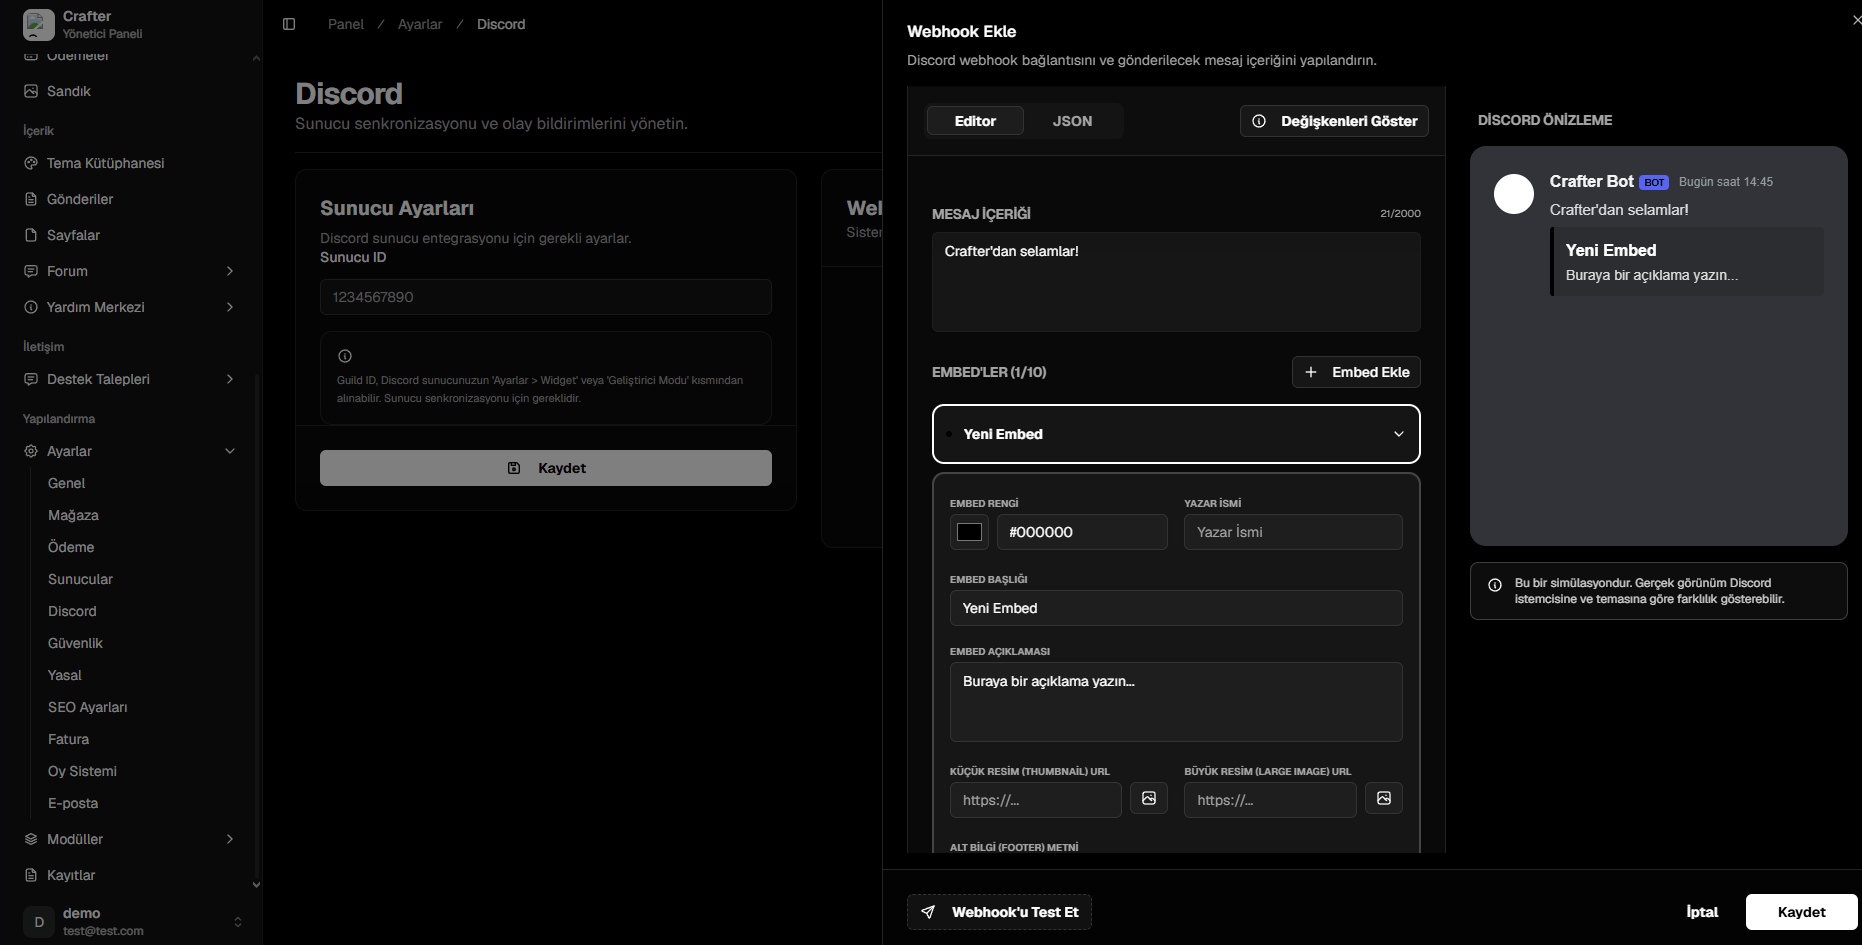 Click **Test Webhook** to dispatch a trial payload to your Discord channel and verify formatting before saving.